Introduction
This post will show you how to convert NVME to 4KN Advanced Format, as by default the vast majority of NVME SSDs will ship with logical sectors set to 512 bytes.
In my previous post I discussed performance differences between 512 vs 4096 bytes sector format, and showed that at least as far as testing goes, there does not seem to be any major performance difference.
Still, using 4KN formatting for newer devices ensure they are operating in their native space, without any need for conversion to happen at the controller.
Some manufacturers will provide tools to do this switch (e.g., Sabrent, Seagate), but what about when these tools are not available, and you know the device runs native 4KN?
I was not able to find a way to do this in Windows, but there is a clever, open source tool called “nvme” that can do the job, as pointed out by Jonathan Bisson in this article, titled “Switching your NVME ssd to 4k“.
The instructions I provide below are quite similar in nature (and I also happen to have a WD SN850 to do this procedure). I did not experience any issue during the conversion, and outline my steps in detail below.
Setup Ubuntu
1 – Obtain a copy of Ubuntu (I chose 20.04), burn it on a USB Key, and boot in Live Mode. Detailed instructions here and here.
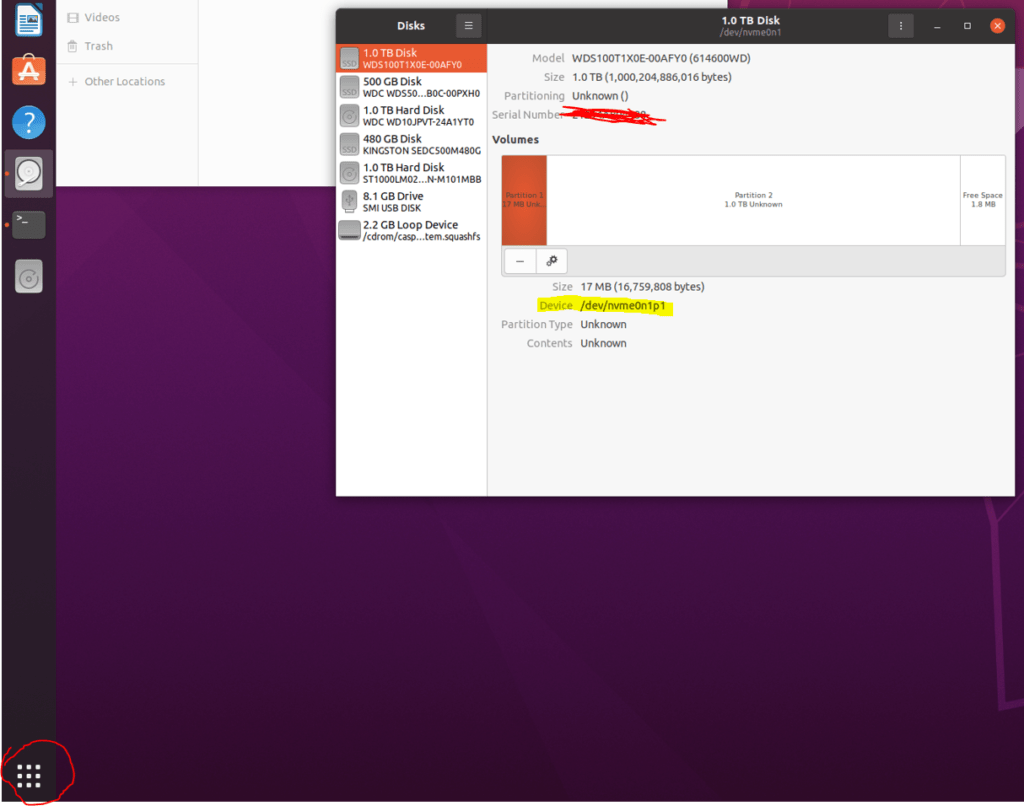
2 – After boot, click on the bottom left corner and find the Disk Utility. Open this utility and find the disk you want to format. Pick one of the partitions on this disk and note the Device field, we’ll need that to identify the disk on the command line.

3 – Click again on the bottom left and this time open the Terminal. Before you can run the nvme utility, you need to install it. Type sudo apt install nvme-cli
NOTE: I recently tried to run this process again with Ubuntu 22.04, and I had to run apt update first, before nvme-cli was available to install

Convert nvme to 4KN on the Target Disk
1 – Run sudo nvme id-ns -H /DEVICE, where DEVICE is the value highlighted in step 2. In this case, I picked /dev/nvme0n1p1

2 – At the very bottom of the results, you should see what is currently active on your device, and if it supports 4KN. You can see on the disk I picked its currently using 512 bytes, and it has the option to switch to 4096 bytes.

3 – Assuming you have to option to switch on your device, and you backed up all your data on this device (as running this command will effectively render the existing data unreadable), you can run sudo nvme format --lbaf=1 /DEVICE, where DEVICE is the value highlighted in step 2.

As you can see, it successfully formated the device, but now you can’t read the partition anymore. To confirm its switched to 4KN, re-run the command from step 5, confirming 4KN is now in use

4 – BEFORE you reformat this disk, completely turn off your computer and restart. In my case, I was able to format a new partition after restart.
5 – To check if the disk is now in 4KN format on Windows, you can run fsutil fsinfo sectorinfo LETTER, where LETTER is the drive letter (in the example below, E:)

Hope you found this article helpful, and if you find a way to do the process on Windows, comment below!
Thank you for posting these instructions! Very helpful!
FYI: you have a small error in your nvme format —lbaf=1 command. You have the letters reversed as labf in your sentence but have it correct in your screenshot.
Ah, thanks for catching that! I’ll get it fixed now!
Pingback: 512E vs 4KN Performance on NVME SSDs - Carlos Felicio
Hello, thanks so much! Without your post, I will never know that my NVME support 4Kn.
I have 2 bootable usb drives with ubuntu and arch-linux. Realized that I’m able to run `nvme` command straight without installing the package.